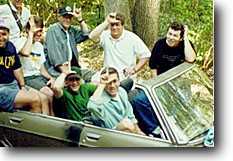
by Pete Schoenenberger SSR#137
[ photo 1 | photo 2 | photo 3 | photo 4 | photo 5 | photo 6 ]
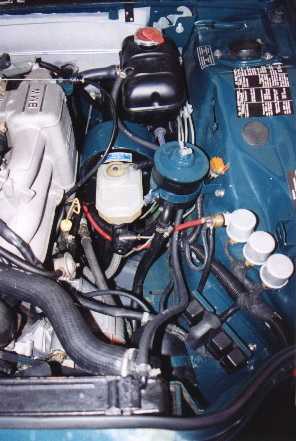
It all started that cold February morning... the previous couple of weeks the Bav had been exhausting quite a bit of smoke out the tail pipe, it would soon go away as the engine warmed up. But, that one morning as I pulled away from the house I noticed a huge wall of fog following me. I knew that this was it, the famous "cracked head syndrome" that so many big six owners have experienced. Little did I know what was about to become of my life in the next 4 months.
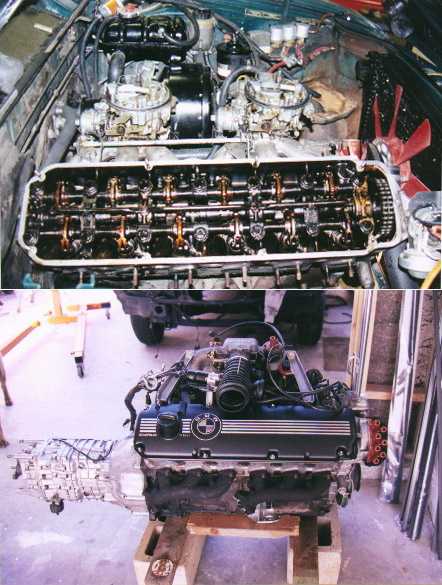
I thought I was prepared for this day. When I first bought my '72 Bavaria I visited the local junk yard and came across another Bav that had a late model head in it. I uncovered the valve cover and noticed that it had been rebuilt recently. So I pulled it and brought it home. It sat in my garage for about a year just waiting for this day to arrive. So here I thought this was going to be a quick head job. I must admit up until this point the\ extent of my car mechanic experience had been just routine maintenance and on occasion a timing belt or two. But I knew that with the help of the SSR anything was possible.
So the dismantling began. Off came the carbs, making sure I labelled everything. Finally off came the head. This was pretty painless. It exposed a lot of the engine bay so I looked forward to cleaning and painting and making it look somewhat nice again. Gerald Stanley's pictures of his rebuild were an inspiration to me at this point. Even though I was just doing a head rebuild I would attempt to clean everything up. The late model head went to my new found friend, the independent BMW mechanic, BMWCCA local chapter tech guru and all around vintage BMW nut and owner of the nicest '74 Tii in town, and just recently a '71 coupe. Mark Schomer replaced the valve seals and touched up of couple of valve seats for me. I was pretty excited, this was going to be low budget head rebuild! I figured I would replace timing chain and sprocket and chain guide etc. etc.... I didn't want to be too cheap and since I was already in there I might as well replace those pieces.
Now fasten your seat belts... this is the turning point. I was told that I should replace the crank sprocket. Hey, it made sense to me why install a new chain with an old sprocket? I was also told that I did not have to remove the oil pan. The oil pump chain would simply come off after I removed the crank sprocket. NOT SO!!! Now I have the crank sprocket pulled half way off and my advisers are telling me I have to remove the oil pan and the oil pump (no duh) etc. etc......
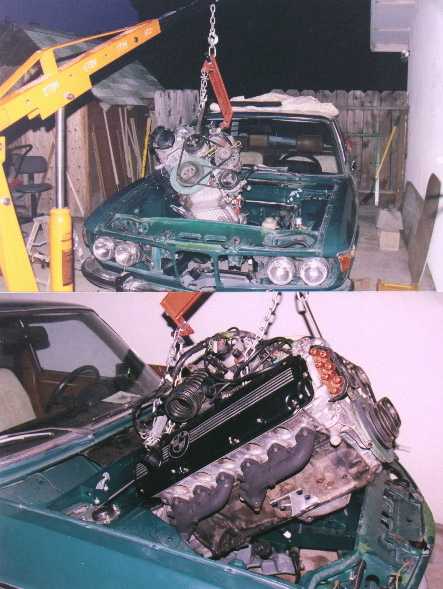
After I finally excepted the fact that I would be removing the motor since I have everything else disconnected, I mean the only thing that was left was the motor mounts and tranny. how difficult could that be? I also kept thinking that without the motor in the way I could really spruce up the engine bay. At this point I could have said enough is enough forget the oil pump sprocket and chain and button her up. If I would have done this I wouldn't be writing this article. Little did I know what I was in for, again!
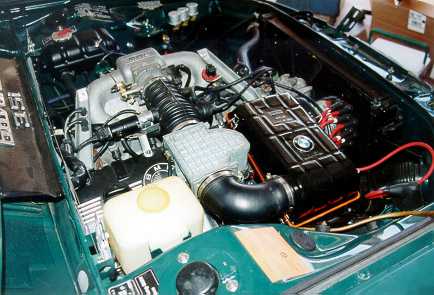
So, out comes the motor. First time I had ever pulled a motor out of a vehicle. I never had intended to do all of this at one time. As a matter of fact all I wanted was a head replacement. I would have been happy with that. But, the deeper you go into the engine and the more you replace or repair the more gremlins that appear. As I dismantled the motor I got to the point where I knew I was going to replace the pistons and bearings etc.... that is when I thought that I would rather do all this to a 3.3L or a 3.5L and benefit from the larger displacement and torque. Since the cost of the replacement parts and labor are identical. I now realize how someone can end up doing a full blown frame off restoration.
The search began for a short block. I had no luck finding something in my budget (at this point I still had a budget). I was coming up on the last days of my search and I was throwing in the towel. I thought that I just may end up rebuilding my original motor, which is really not a problem if you have no other choice. Then I stumbled across a couple of ads on EBAY. It was obvious that the seller was parting out an '85 535i. I emailed him to ask if the motor was available. He replied that it was at CLASSIFIEDS 2000. Sure enough there it was, still in the car! To make a short story long I contacted him and made a deal. BTW the car was still drivable! The clutch was on its last leg though. The next morning my friend and I drove the 170 miles to look at the car. It looked almost to good to become a donor. I drove it home, it ran beautifully.
My mechanic gave it the thumbs up after a successful compression and leak down test. Now I was in the thick of it. Dismantling one car to salvage what I could and selling the rest, and transplanting motor, injection and tranny into the Bavaria. I thought this simple head rebuild would never end! After everything was said and done I broke even, the total of parts sold was equal to what I paid for the car. I got the motor, fuel injection and tranny for free!
The best advice I can give to my fellow E3 owners is to try and locate a whole car that is running. It is amazing how many parts are still interchangeable between the two models. I can only speak for this '85 535i since that is the extent of my experience. I used the door frame rubber which fit perfectly into the E3. I understand that the rear end will fit also. Power antenna, power windows, doorlocks, radiator and the list goes on. I even fitted the rear seat into the Bav. It looked pretty impressive. It fits very well except for the fact that it is slightly tall on the back side. I will install the power windows and door locks sometime in the future.
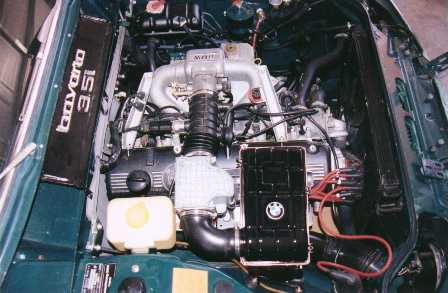
This conversion has given my Bav new life. It is so nice to idle steady at 750-800 rpm all day long. I hope that through my experience some of you will do this same thing to your Bavaria. Whether it be L-Jetronic or a 3.5L. As E3 owners we are lucky to have so many options for engine transplants. More of us need to take advantage of this opportunity. I feel that this transplant will keep my Bavaria on the road for another 28yrs! I would also like to give special thanks to my wife, Melissa, she was very understanding throughout the whole process. A big thanks also goes to my kids who would often have that look on their face: WHY???
Technical stuff-
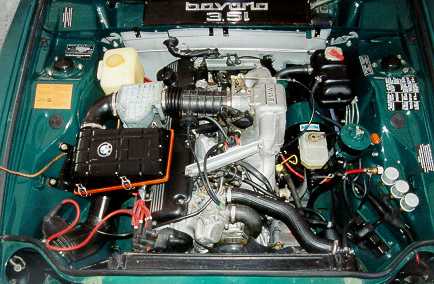
1. Tank and fuel supply modifications. The Motronic system has a low pressure pump in the fuel tank which feeds the high pressure pump after going through the filter. The fuel supply is under high pressure from the pump to the pressure regulator. Then whatever fuel is not used by the injectors is returned to the fuel tank via the low pressure return line. I opted to use the original E3 fuel line for my return line. I used the fuel sending unit from my E28 parts car, since it was there. BUT... I was informed that a fuel sending unit from an E21 will fit even better. Supposedly it has the same bayonet fitting as the E3. If this is so I would recommend doing this instead of what I did. I had to drill six holes in my tank to mount the E28 sending unit. It all depends on what is available to you. Then I installed a 5/16" diameter stainless steel tube as my new fuel supply line, which will be under pressure. I ran it parallel with the original line and used the folding clamps that hold the original line in place to hold the new line. I was very satisfied with this setup. I took the original E28 high pressure fuel pump and filter assembly and located it in the right side rear fender well. Just below the fuel expansion tank. The bracket can be mounted in such a way that it is suspended on three points, all of them having rubber bushings so the vibration won't be felt throughout the vehicle. As far as the electricals go all you need is the + power from the engine wiring harness to the fuel pump. Both pumps are powered from same source. The fuel level sending unit from the 535i has the same color wiring and plug as the E3.
Remember to used high pressure rubber hose for the high pressure side and don't run the rubber line under the car where it can get sliced or damaged. Use double house clamps on the connections. On the return line it is OK to use regular fuel line. I can't stress the importance of doing a quality job on the fuel system. You don't want leaks to develop over time because of faulty house connections or bad wiring. So take your time and do it right.
Brake booster. The original E3 brake booster is entirely to big! It is the diameter of the booster that is to large and will interfere with the Motronic intake manifold. Installing a "thinner" booster from another E3 will result in the same interference problem. The other option is to go with the hydraulic booster system that is found on many of the later BMWs. I had this option since the E28 has the hydraulic system but I opted for the Tii booster since it is simpler and I had good luck in locating one for a good price. I did have to make a new coupling that connects the booster rod to the brake pedal rod. I also had to drill and tap a hole in the intake manifold for a vacuum source for the booster.
The clearance between the booster and the intake manifold is approximately 1/8" to 3/16". Which is closer than I thought it would be. But it doesn't hit... yet. If this makes you nervous then go with the hydraulic system, this way you never have to worry about interference. Where to locate the ECU? I was contemplating mounting the ECU on the passenger side of the engine bay next to the wiper motor. Since the wire harness fits perfectly through the hole for the drain tube. But, I wasn't to crazy about the thought of water getting to the ECU and the heat of the exhaust being close by. On further investigation I found an ideal spot right behind the glove box on the right hand side as your sitting in the passengers seat. Removing the glove box entirely was the best way to get access to this area. I had to drill two, 2" diameter holes for the harness to go through. The first one went through the upper fire wall into the area where the wiper motor is located, the second one went through the body where the sheetmetal begins to curve, towards the passenger door. Don't forget the rubber grommets to protect the wires from sharp edges. Three bolts secure the ECU to the sheet metal. After the glove box is installed nothing is visible from the interior, or when the glove box is opened.
Electricals. The motor has a male and female Engine Plug where all the electrical stuff is neatly connected from motor to car. On the donor car this plug is on the side of the fuse box. I actually used the side of the fuse box and cut away the rest of the box, attached this piece of plastic to a piece of angle aluminum and attached that to the body where my battery used to be. There are 3 relays that attach to the side here also. This was very simple, since it was wired the same way in the donor car I didn't have to cut any of these connections. I did remove the few wires that I wouldn't need . Now that my engine plug was mounted securely I could wire the Bavaria's existing wiring to the female side of the engine plug. This included (1)alternator, (2)water temp, (3)oil pressure, (4)fuel pump and (5)+ power from #11 fuse in the Bav. There are two connections that go to the coil that could have been installed here but since they are already at the coil, I left them in there original location. I also relocated the battery to the trunk so I made a positive terminal and mounted it where my voltage regulator was. Here I connected the cable to the starter, (which is the source of power), the original +cable to the Bavaria and the + cable to the motor.
As I mentioned before the 5sp tranny came with the motor so there were the normal issues of doing the tranny swap. I installed a new clutch master cylinder. I went with the original E28 guibo and since the driveshaft had been rebuilt and removable u-joints were installed, I kept it. The only thing I had to do was have it shortened slightly and balanced. I also had to install the speedo gear into the tranny. This was much easier than I thought it would be, just remove the output shaft nut and take out the spacer and install gear. You must remove the freeze plug that is in the hole where the speedo cable goes also.
I installed the oxygen sensor in the downpipe just under the passenger area. Ran the wires up on the top side of tranny to the plug. I used the 535i power steering pump and alternator. This was the simple way to go since the bracket is slightly different than the E3. I did have to make a new power steering hose since the fitting on the pump is different than the E3.
Linkage to the motor was very simple. I kept the original linkage and just drilled a hole into the plate that is mounted on the motor mount. You'll need to make a custom bracket that holds the cable stationery. Mount this bracket onto the manifold support and your ready to go.
[ photo 1 | photo 2 | photo 3 | photo 4 | photo 5 | photo 6 ]